
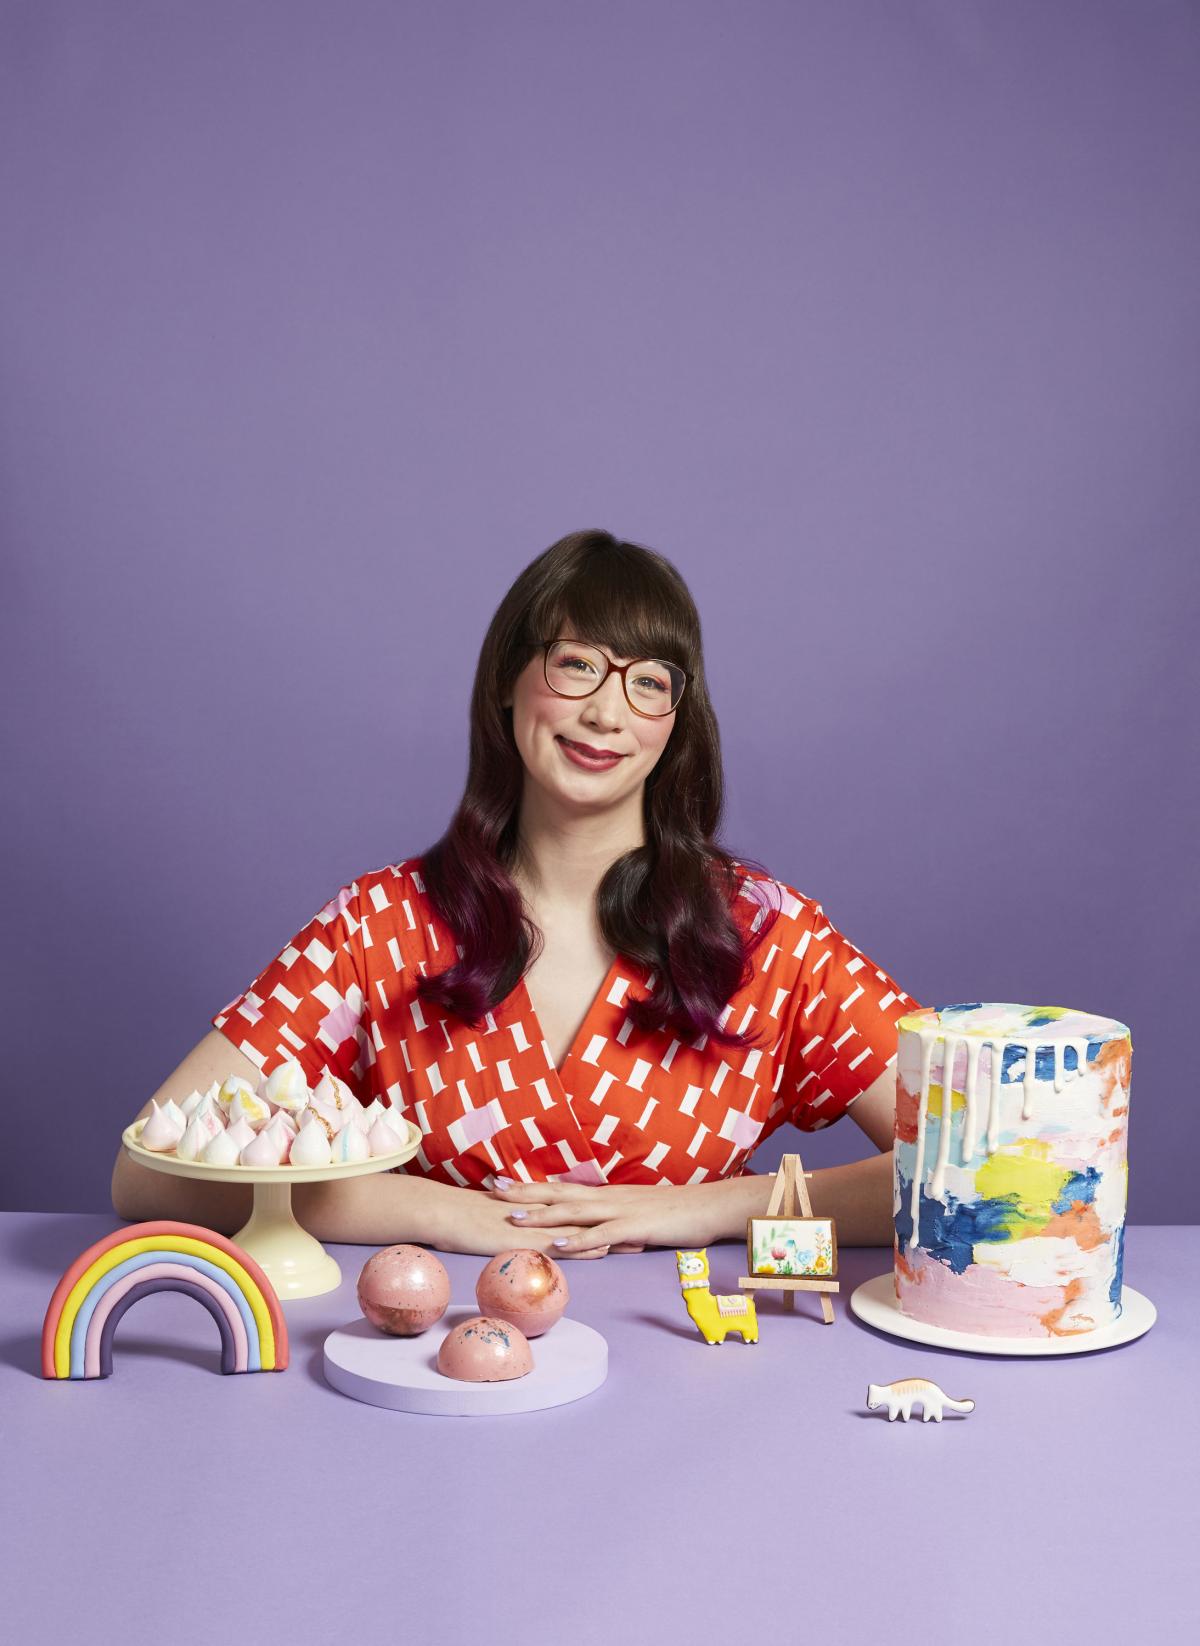

Last year's Bake Off finalist Kim-Joy Hewlett is all about the 'feel-goodness' factor with her debut cookbook, Baking With Kim-Joy - tag-lined: 'Cute And Creative Bakes To Make You Smile'. Here are three recipes to try at home...
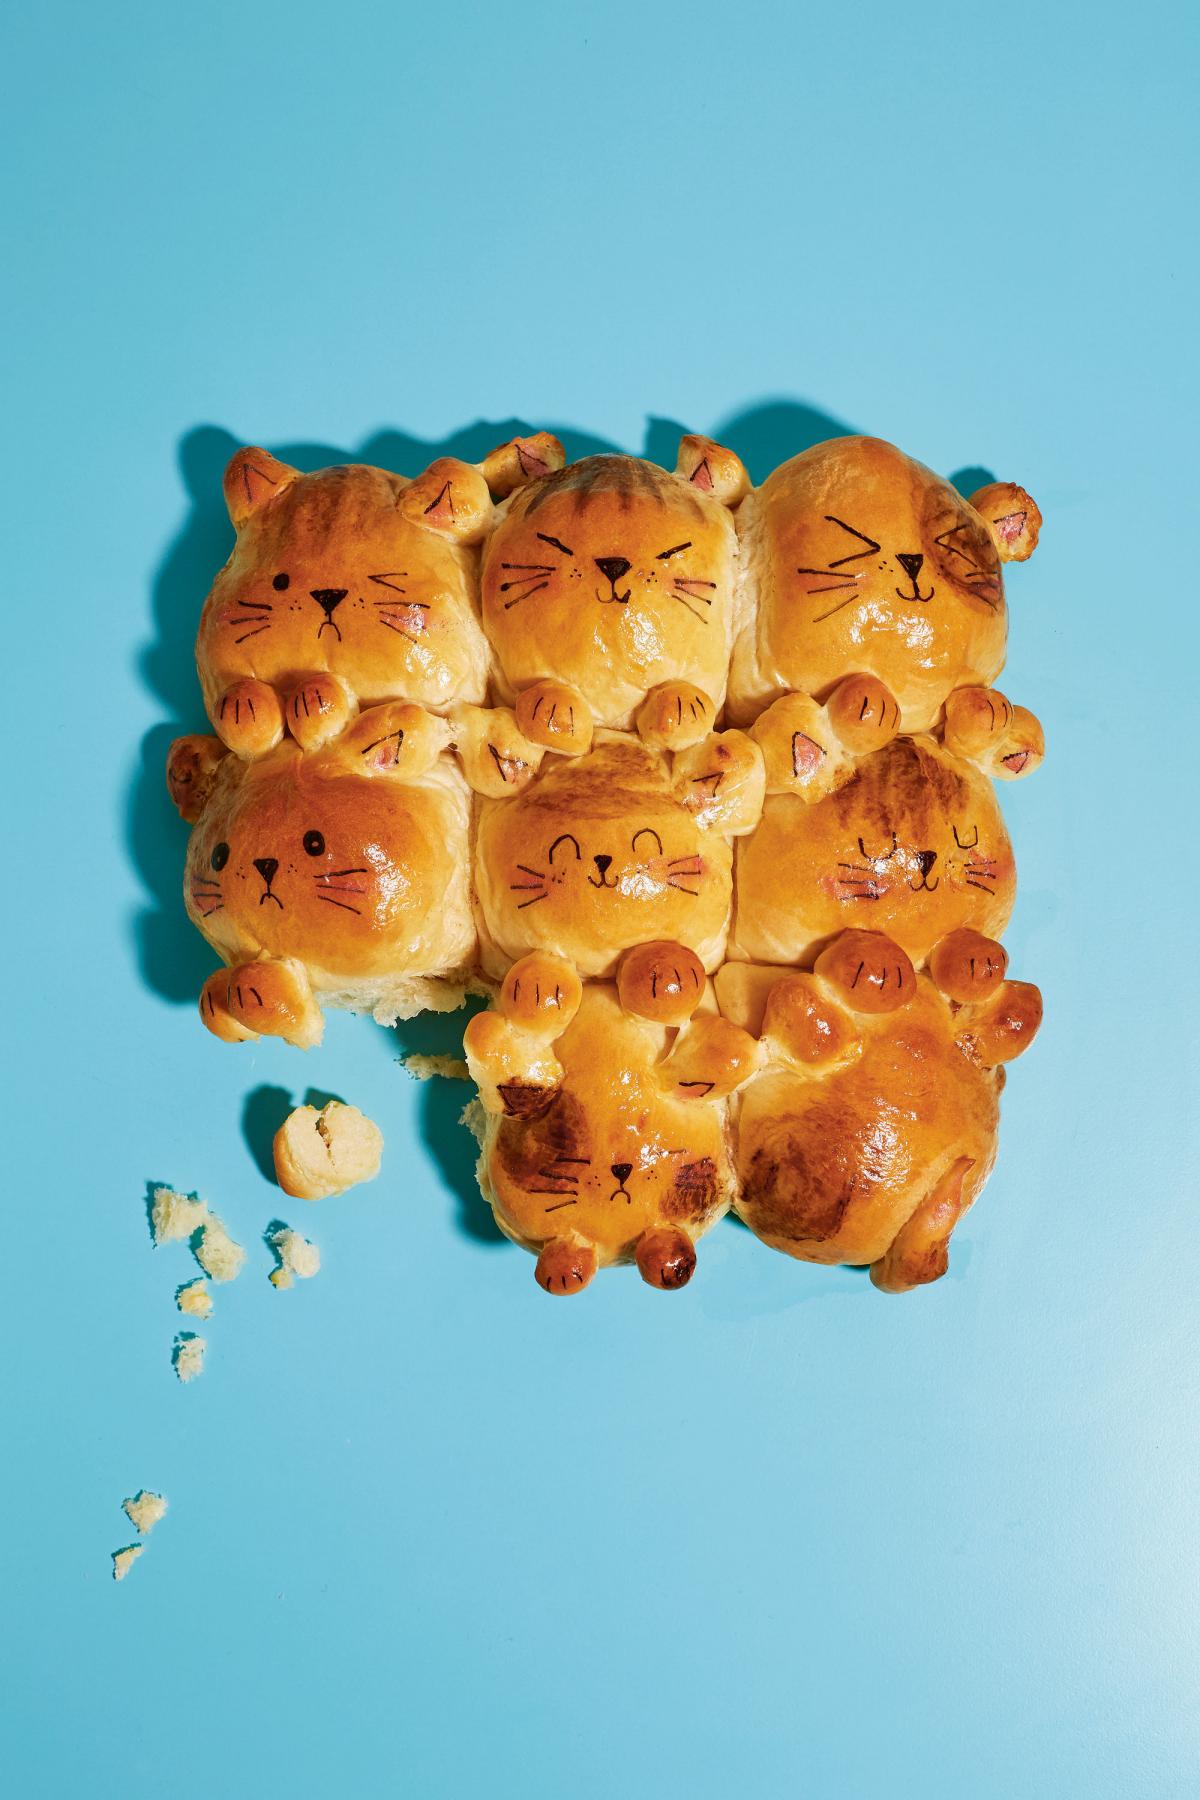
TANGZHONG CAT BUNS (makes 9)
For the Tangzhong paste:
25g strong white flour, plus extra for dusting
100ml water
For the dough:
125ml whole milk, plus extra for brushing
30g unsalted butter
Oil, for oiling
10g caster or granulated sugar
1tsp salt
1 large egg
350g strong white flour
7g fast-action dried yeast
Plus:
1 egg, lightly beaten, for brushing
Brown food dye
A small amount of vodka or alcohol-based extract black edible pen, or royal icing dyed black (see ingredients and instructions below)
For the royal icing, if required:
40g egg white (or aquafaba for a vegan version)
210g icing sugar
Plus a little extra egg white (or aquafaba) and icing sugar to adjust and get the right consistency
To make, use a stand mixer (or handheld electric whisk) fitted with a balloon whisk attachment to combine the egg white (or aquafaba) and icing sugar until you get a smooth consistency. Then add tiny amounts of extra egg white (or aquafaba) and/or icing sugar to get the right consistency. Add black food dye to colour as desired!
1. First, make the tangzhong paste. Using a balloon whisk, mix the flour and water together in a pan until smooth. Place the pan over a low-medium heat and stir constantly with a spatula until thickened to a pudding-like consistency. If you have a thermometer the paste should reach 65°C/149°F before you take it off the heat. Transfer the tangzhong to a small bowl, cover with plastic wrap (making sure this touches the surface of the tangzhong) and chill in the freezer for 10 minutes.
2. Meanwhile, for the dough, warm the milk in the microwave. It should be warm but not hot. Melt the butter, too. Lightly oil a large bowl and grease a 20-cm square baking tin, then set aside.
3. Place the milk and butter in a large bowl and add the sugar and salt. Add the chilled tangzhong to the bowl along with the egg and whisk together.
4. Add the flour and yeast to the mixture. If using a stand mixer, just allow the machine to knead for 10 minutes with the dough hook attachment. If working by hand, use a wooden spoon to combine everything into a shaggy ball of dough, then turn out onto a floured surface.
5. Knead by hand for about 10-15 minutes. The dough will be sticky to start with, but avoid adding too much flour - it will gradually become less sticky as you knead it. If the dough sticks to the surface, use a dough scraper to scrape it off. Keep kneading until the dough is smooth; it will still be a little tacky, but that is normal.
6. Place the dough in the oiled bowl and cover with plastic wrap. Leave to rise in a warm place until doubled in size. This takes about one hour, but it depends on the temperature of your kitchen.
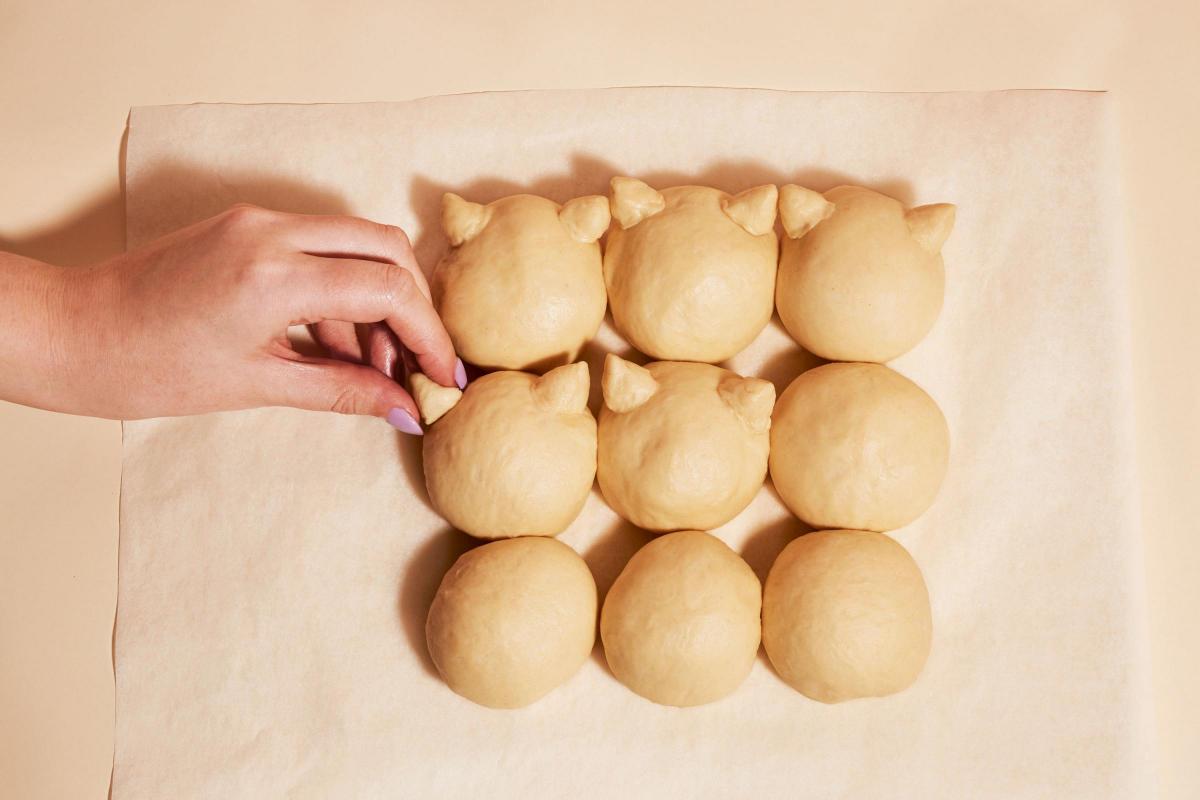
7. When the dough has doubled in size, turn it out onto a lightly floured surface and knock back. Form into nine balls, weighing 65g each. Shape them by tucking the dough under to create a smooth surface. There will be leftover dough - this is to shape the ears and paws.
8. Shape the small balls of dough into ears and paws for the cats (see picture). You can brush on a little milk to help them stick. Shape a tail for one of the buns - this will look like the cat has turned around. Work fast to avoid the dough forming a skin.
9. Place the dough balls in the prepared square tin. Cover with lightly oiled plastic wrap and leave to prove in a warm place until roughly doubled in size. The time this takes varies depending on the temperature of your kitchen, but won't be as long as the first rise. You are looking for the dough to have nearly doubled in size and spring back halfway when lightly pressed with a finger.
10. About 15 minutes before the end of the proving time, preheat the oven to 180°C/350°F/Gas mark 4.
11. Brush the beaten egg on top of the buns just before baking. Bake for 20 minutes until lightly golden brown. You will need to cover the buns with foil after five to 10 minutes, just to prevent them browning too much.
12. Transfer to a rack and leave to cool completely.
13. Paint coloured patches on the cold buns using a little brown food dye mixed with a tiny bit of vodka. When dry, use black edible pen, or your dyed-black royal icing, to add cute facial features and details to the paws.
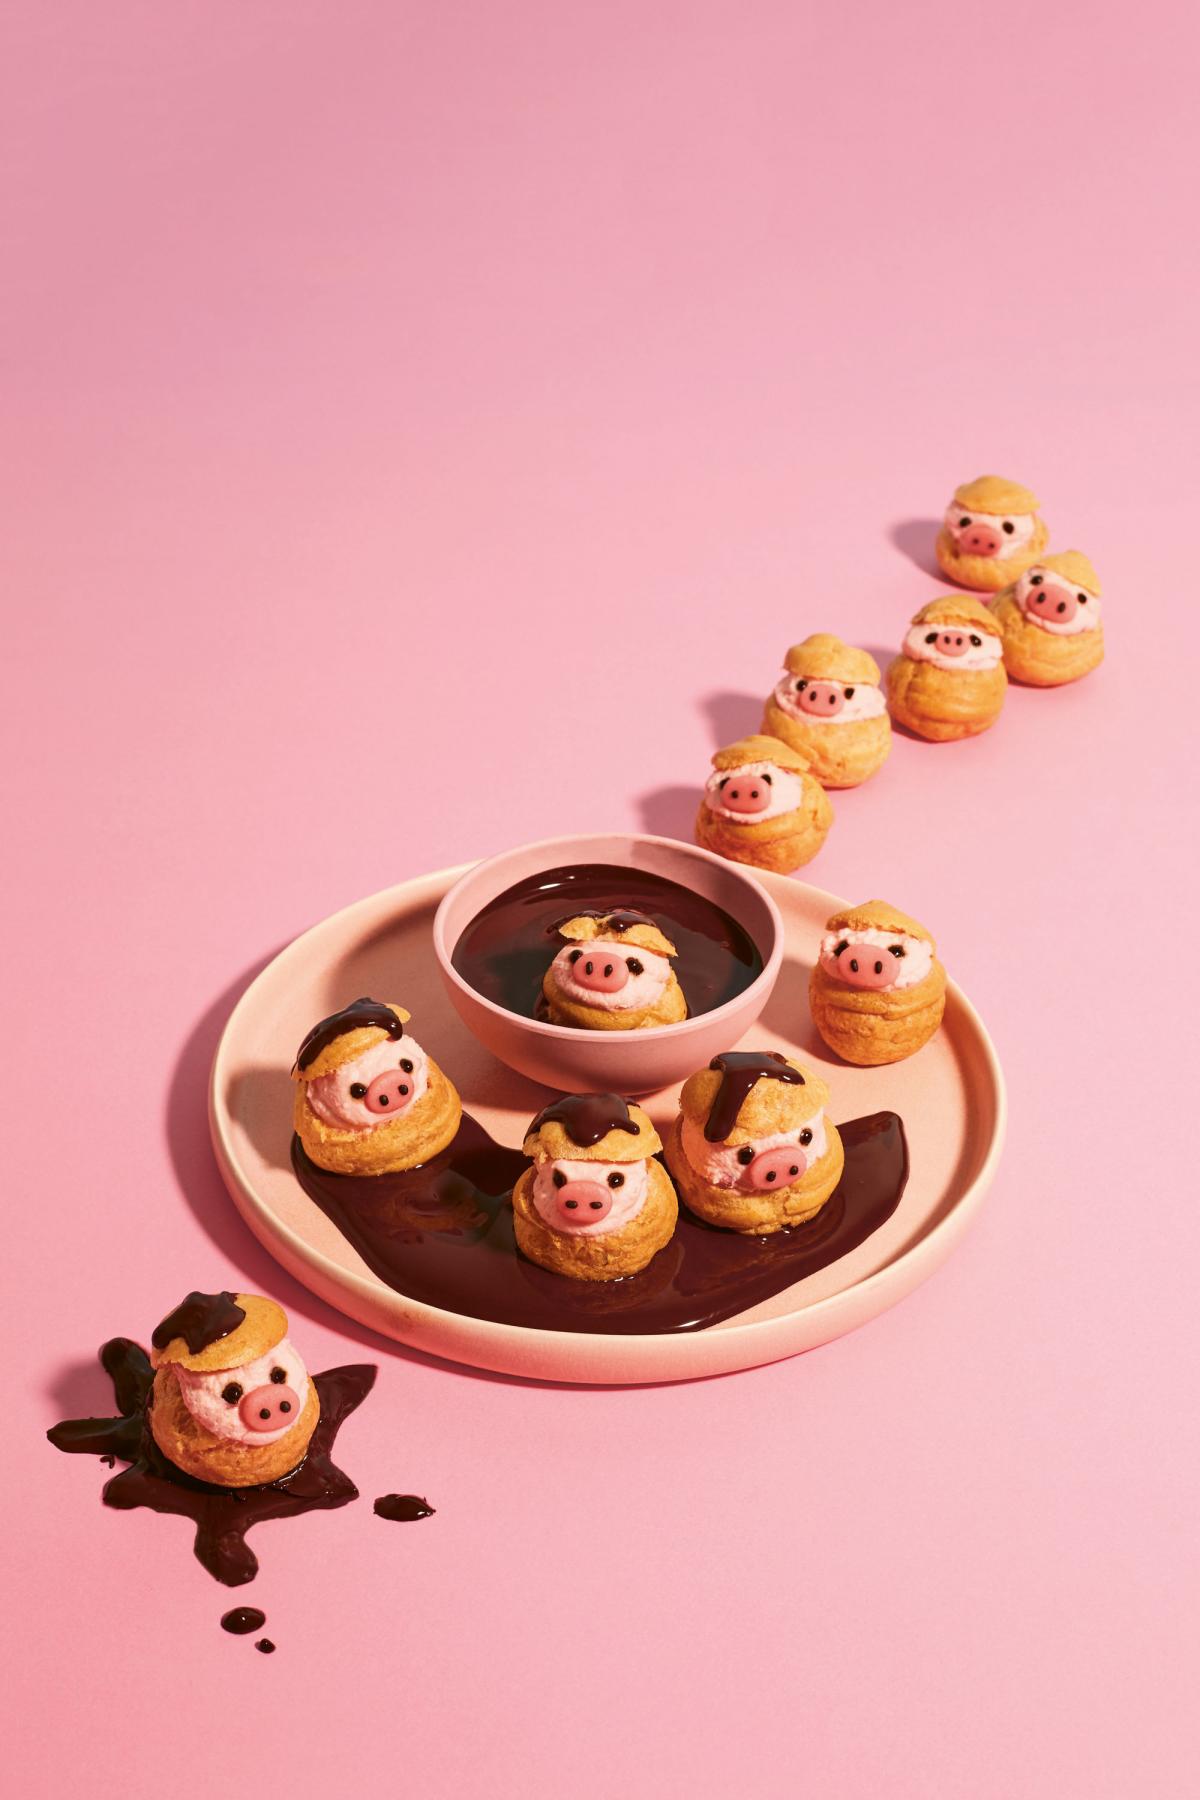
PIGFITEROLES IN MUD (makes about 15)
For the strawberry filling:
300ml double cream
2tbsp icing sugar
4tsp freeze-dried strawberry powder
Pink gel food dye
For the black royal icing:
(This makes more than you need, as it is difficult to make very small quantities, but you can use this on other baking projects!)
1/2 quantity of Royal Icing (see below)
Gel black food dye
Plus:
1 quantity of Choux Pastry (see below)
About 30g marzipan
Pink gel food dye
Dark chocolate, for the mud
For the choux pastry:
85g unsalted butter
225ml water
Pinch of salt
50g plain flour
50g strong white flour
2-3 medium eggs
For the royal icing:
40g egg white (or aquafaba for a vegan version)
210g icing sugar
Plus a little extra egg white (or aquafaba) and icing sugar to adjust and get the right consistency
1. Preheat the oven to 200°C/400°F/Gas mark 6. Line a baking sheet with baking paper or a silicone mat.
1. Make the choux pastry. Chop the butter and add it to a small saucepan with the water and salt. Heat until the butter has melted and the mixture is starting to bubble. Meanwhile, combine both flours in a separate bowl. When the butter mixture is bubbling, remove it from the heat and add the flours all in one go. Stir with a wooden spoon until it forms a smooth ball that pulls away from the sides very easily - this is called a panada.
2. Transfer the panada to a stand mixer (or use a handheld electric whisk) fitted with the paddle attachment and leave to cool for five to 10 minutes.
3. Add two eggs, one at a time, to the panada, mixing on slow speed after each addition until combined. Whisk the third egg in a separate bowl and gradually add one tablespoon at a time, mixing well after each addition. You are looking for a glossy consistency that leaves a 'v' shape when a spoon is lifted out of the dough. Transfer to a piping bag and cut a medium tip. Pipe about 15 circles onto the prepared baking sheet or mat. Dip your finger in water and use to flatten the tip of the choux.
4. Bake for 10 minutes, then reduce the oven to 180°C/350°F/Gas mark 4 and bake for a further 20 minutes. Don't open the oven until at least 25 minutes have passed, to avoid the choux pastry deflating.
5. When the choux buns have finished baking, immediately turn them over and use a knife to pierce the base. This is so that the air inside has somewhere to escape.
6. While the choux are cooling, make the strawberry filling. Put the cream, sugar and strawberry powder in a clean, grease-free bowl. Whip on medium-high speed until stiff enough to pipe and hold its shape, but be careful not to overwhip. While whipping, gradually add very small amounts of pink food dye until a pale pink is achieved. Transfer to a piping bag and cut a large tip. Cut the tops off each choux bun, pipe in the whipped cream and replace the top.
7. Knead a tiny amount of pink food dye into the marzipan. Shape it into noses for the pig faces and place on the whipped cream.
8. Make the royal icing and dye black. Use a stand mixer (or handheld electric whisk) fitted with a balloon whisk attachment to combine the egg white (or aquafaba) and icing sugar until you get a smooth consistency. Then add tiny amounts of extra egg white (or aquafaba) and/or icing sugar to get the right consistency. Add black food dye to colour as desired! Transfer to a piping bag and cut a small tip. Use to pipe each pig's eyes and two dots for nostrils.
9. Melt some dark chocolate in a heatproof bowl set over a pan of gently simmering water. Make sure the bottom of the bowl doesn't touch the water. Arrange the pigfiteroles in a mud bath of melted chocolate and carefully drizzle some chocolate over the tops to finish off your pigfiterole scene! It's best to eat these delicious cuties straightaway... not that that will be difficult at all!
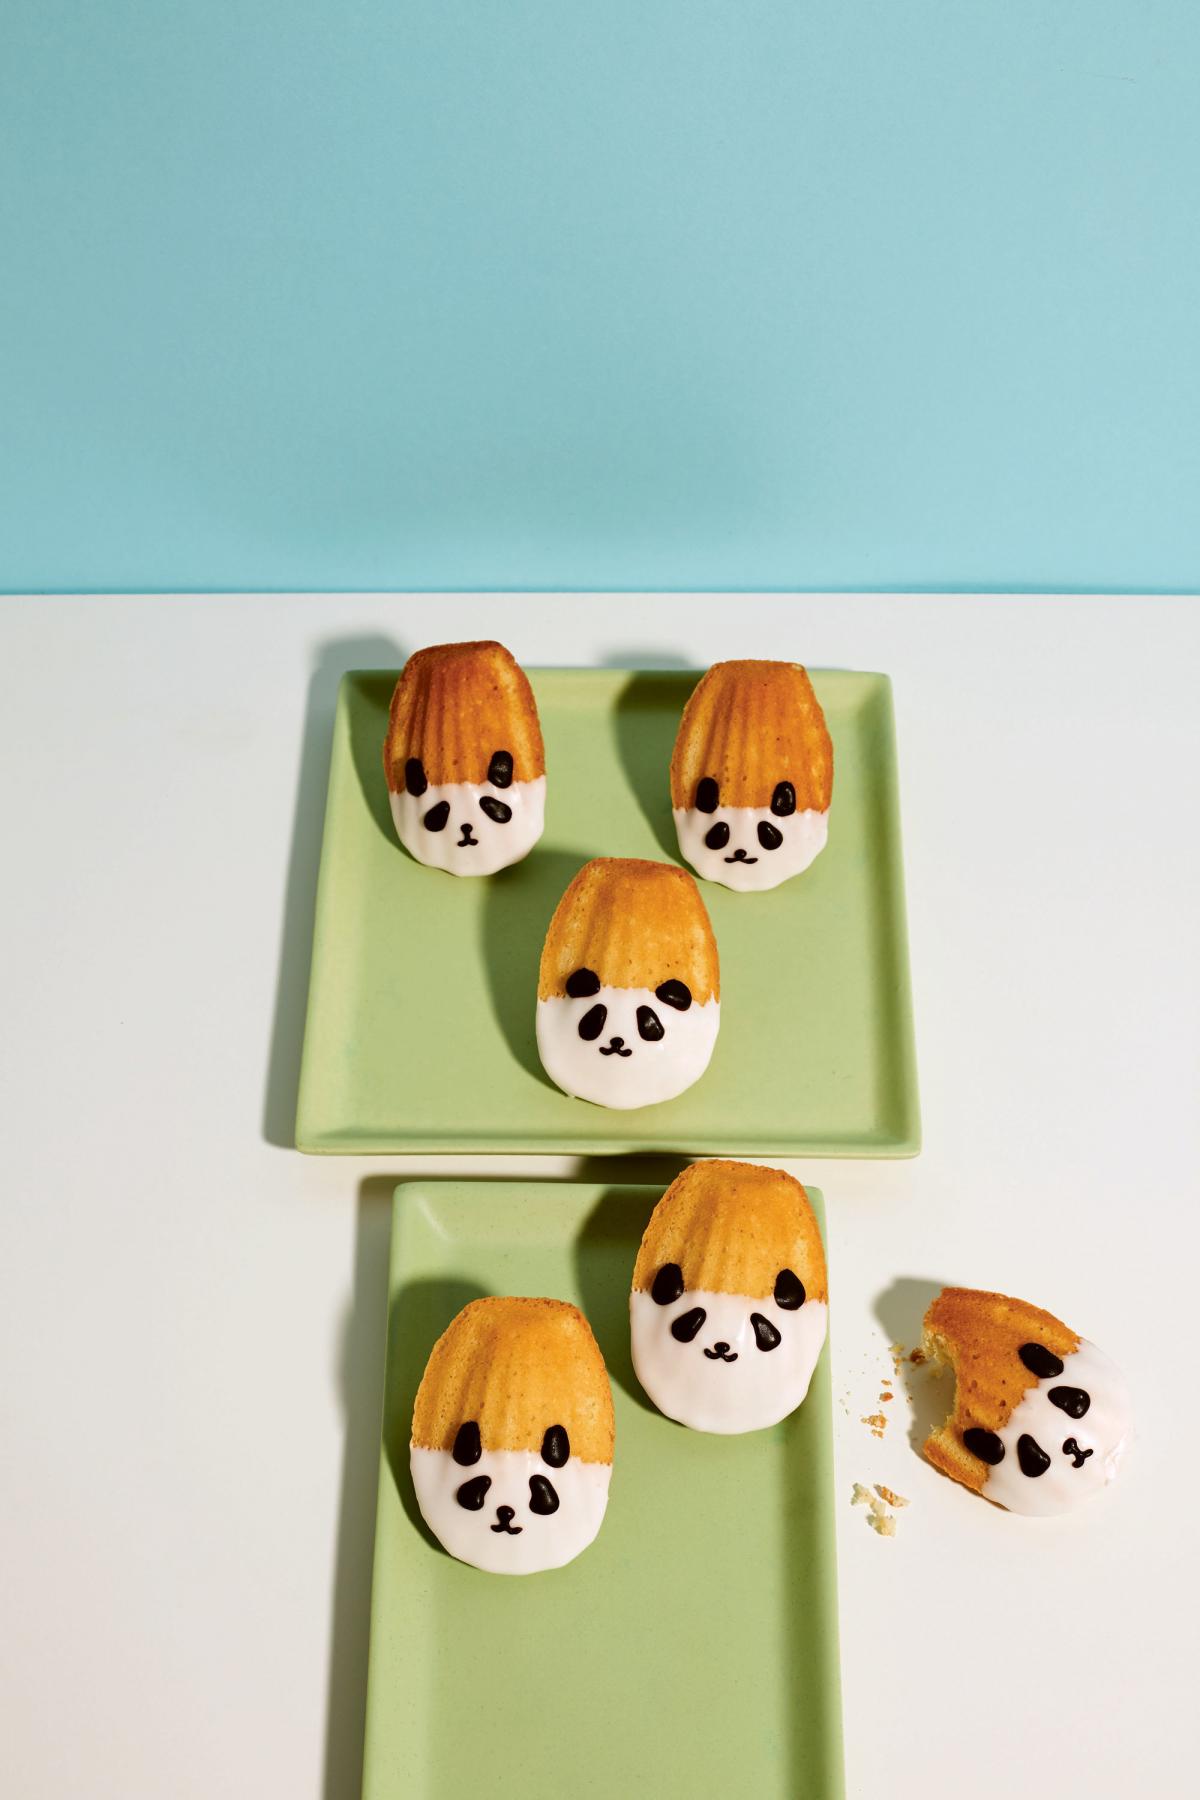
LAVENDER AND LEMON PANDALEINES (makes 12-15)
100g caster or granulated sugar
2 medium eggs
70g salted butter, plus extra for greasing
135g plain flour
1tsp baking powder
3/4tsp culinary lavender buds
30ml whole milk
For the lemon dip:
40-45ml lemon juice
200g icing sugar
Plus:
Black food dye
A little extra icing sugar
1. Put the caster sugar and eggs, ideally, in a stand mixer (or use a handheld electric whisk) and whisk on high speed for about seven minutes, or until thick and holds a trail. Meanwhile, melt the butter in 20-second bursts in the microwave so that it is liquid but not too hot. Combine the flour and baking powder in a separate bowl. Grind the lavender with a mortar and pestle to break up.
2. When the sugar and egg mixture is thick and holds a trail, pour in the milk, then sift in the flour and baking powder. Add the lavender and then whisk until just incorporated. Pour in the cooled melted butter and whisk again until just combined. Do not over-mix. Cover with plastic wrap and chill in the freezer for 30 minutes.
3. Grease a madeleine mould, then freeze it. Preheat the oven to 240°C/475°F/Gas mark 9.
4. When the mixture has finished chilling, use a spatula to transfer it to a piping bag. Snip a medium tip and pipe 12-15 blobs into the chilled mould.
5. Place in the oven and immediately reduce the temperature to 200°C/400°F/Gas mark 6. Bake for eight to 12 minutes until each madeleine has a hump and is starting to colour at the edges. When baked, slide them out of the mould and onto a rack.
6. Meanwhile, make the lemon dip. Whisk the lemon juice and icing sugar together until smooth and runny but still opaque when coating the back of a spoon. Add a little more lemon juice or icing sugar until you have the correct consistency. Pour into a cup suitable for dipping the madeleines into and cover with plastic wrap.
7. When the madeleines are cool, dip, one by one (narrow, scalloped end first), into the lemon dip. Leave the madeleines to set on a rack.
8. Mix the remaining lemon dip with black food dye and a little extra icing sugar until it becomes pipeable. Transfer to a piping bag and cut a small tip. When the white icing has set, use the black icing to pipe ears, eyes and a nose on each madeleine.
Baking With Kim-Joy: Cute And Creative Bakes To Make You Smile by Kim-Joy, photography by Ellis Parrinder, is published by Quadrille, £18.99.


Comments: Our rules
We want our comments to be a lively and valuable part of our community - a place where readers can debate and engage with the most important local issues. The ability to comment on our stories is a privilege, not a right, however, and that privilege may be withdrawn if it is abused or misused.
Please report any comments that break our rules.
Read the rules here